Wednesday, April 21, 2010

Solaris : Veritas Volume Manager : Root Mirroring


Recommendations:
1. The disk which holds the Solaris Operating System and the disk where the
operating system is to be mirrored could be with same geometry.
2. Copy the /etc/system file and /etc/vfstab file as a precaution before
initiating the changes.


Condition:

1. The disk (which has the operating system) and the disk going to have the
mirror should be brought under the control of volume manager only with
Sliced layout.
2. Here the disk had been brought under the volume manager control as mentioned
above under the disk group named “ rootdg”
3. We have to bring the disk (which has the operating system) under the control
of volume manager through Encapsulation. This is done to preserve the data,
contained in the disk.


Output: Before bringing the disk under the volume manager control:


bash-3.00# vxdisk list
DEVICE TYPE DISK GROUP STATUS
c1t0d0s2 auto:none - - online invalid
c1t1d0s2 auto:none online invalid
c2t3d0s2 auto:simple - - online invalid
c2t5d0s2 auto:cdsdisk oradg1 oradg online
c2t9d0s2 auto:cdsdisk oradg2 oradg online
c2t10d0s2 auto:cdsdisk oradg3 oradg online
c2t12d0s2 auto:cdsdisk oradg4 oradg online


Steps followed:

# cp /etc/system /etc/system.orig.bkp
# cp /etc/vfstab /etc/vfstab.orig.bkp
# vxdiskadm

Choose the option: 2
Used to bring the disk under volume manager control through encapsulation. This utility will guide us, while bringing the disk under volume control bring it with Sliced layout, under the group “rootdg”.

Initially the disk group named “rootdg” will not exist. Create the same at time of initiating the disk.

Once the disk ( OS disk ) is brought under the control of volume manager, it requires to restart the system twice.

Once the system is restarted, we can observe the changes to the file /etc/system and /etc/vfstab.


Output : /etc/vfstab (After restarting the system twice)

bash-3.00# cat /etc/vfstab
#device device mount FS fsck mount mount
#to mount to fsck point type pass at boot options
#
fd - /dev/fd fd - no -
/proc - /proc proc - no -
/dev/vx/dsk/bootdg/swapvol - - swap - no nologging
/dev/vx/dsk/bootdg/rootvol /dev/vx/rdsk/bootdg/rootvol / ufs 1 no nologging
/devices - /devices devfs - no -
sharefs - /etc/dfs/sharetab sharefs - no -
ctfs - /system/contract ctfs - no -
objfs - /system/object objfs - no -
swap - /tmp tmpfs - yes -
#/dev/dsk/c1t1d0s3 /dev/rdsk/c1t1d0s3 /mnt/veritas ufs - yes -
#NOTE: volume rootvol (/) encapsulated partition c1t0d0s0
#NOTE: volume swapvol (swap) encapsulated partition c1t0d0s1

Note:
1. rootvol and swapvol should exist in the disk group that is chosen to be boot disk group.(Also, with name rootvol and swapvol, volumes can be created on other disk groups.) Only the rootvol and swapvol in bootdg can be used to boot the system.

2. bootdg is an alias for the disk group that contains the volumes that are used to boot the system.

3. Volume manager sets bootdg to the appropriate disk group, if it takes the control of the root disk.
Otherwise, bootdg is set to nodg (no disk group).

We can observe the changes by executing
# vxprint –vt


We have to bring the next disk under the volume manager control as above with sliced layout either by using
# vxdiskadm utility

or by executing

# vxdisksetup –i c1t1d0 format=sliced


Note:
Here system has to be restarted twice.


Output: After bringing both the disk under the disk group (rootdg) with sliced layout.

bash-3.00# vxdisk list
DEVICE TYPE DISK GROUP STATUS
c1t0d0s2 auto:sliced rootdg01 rootdg online
c1t1d0s2 auto:sliced rootdg02 rootdg online
c2t3d0s2 auto:simple - - online invalid
c2t5d0s2 auto:cdsdisk oradg1 oradg online
c2t9d0s2 auto:cdsdisk oradg2 oradg online
c2t10d0s2 auto:cdsdisk oradg3 oradg online
c2t12d0s2 auto:cdsdisk oradg4 oradg online


# vxmake –g rootdg mirror rootvol
will mirror the root.
The sync status can be observed in another terminal by executing
# vxtask list


This takes some time sync.

or

# vxmirror –g rootdg –a
This command, mirrors all existing volumes for the specified disk group.


Note:
# vxmirror
1. Provides a mechanism to mirror all non-mirrored volumes, that are located on
a specified disk, to mirror all currently non-mirrored volumes in the
specified disk group.
2. To change or display the current defaults for mirroring
3. All volumes that have only a single plex (mirror copy), are mirrored by
adding additional plex.
4. Volumes containing sub-disks that reside on MORE THAN ONE DISK ARE NOT
MIRRORED by this vxmirror command.


Similarly to mirror the swap,
# vxmake –g rootdg mirror swapvol


Outputs: After mirroring the root
bash-3.00# df -h

Filesystem size used avail capacity Mounted on
/dev/vx/dsk/bootdg/rootvol
5.8G 5.3G 465M 93% /
/devices 0K 0K 0K 0% /devices
ctfs 0K 0K 0K 0% /system/contract
proc 0K 0K 0K 0% /proc
mnttab 0K 0K 0K 0% /etc/mnttab
swap 2.0G 1.6M 2.0G 1% /etc/svc/volatile
objfs 0K 0K 0K 0% /system/object
sharefs 0K 0K 0K 0% /etc/dfs/sharetab
/platform/sun4u-us3/lib/libc_psr/libc_psr_hwcap1.so.1
5.8G 5.3G 465M 93% /platform/sun4u-us3/lib/libc_psr.so.1
/platform/sun4u-us3/lib/sparcv9/libc_psr/libc_psr_hwcap1.so.1
5.8G 5.3G 465M 93% /platform/sun4u-us3/lib/sparcv9/libc_psr.so.1
fd 0K 0K 0K 0% /dev/fd
swap 2.0G 120K 2.0G 1% /tmp
swap 2.0G 40K 2.0G 1% /var/run
swap 2.0G 0K 2.0G 0% /dev/vx/dmp
swap 2.0G 0K 2.0G 0% /dev/vx/rdmp


bash-3.00# vxprint -s
Disk group: rootdg

TY NAME ASSOC KSTATE LENGTH PLOFFS STATE TUTIL0 PUTIL0
sd rootdg01-B0 swapvol-01 ENABLED 1 0 - - Block0
sd rootdg01-01 swapvol-01 ENABLED 4097330 1 - - -
sd rootdg01-02 rootvol-01 ENABLED 12288402 0 - - -
sd rootdg02-01 rootvol-02 ENABLED 12288402 0 - - -
sd rootdg02-02 swapvol-02 ENABLED 4097331 0 - -


bash-3.00# vxprint -p
Disk group: rootdg

TY NAME ASSOC KSTATE LENGTH PLOFFS STATE TUTIL0 PUTIL0
pl rootvol-01 rootvol ENABLED 12288402 - ACTIVE - -
pl rootvol-02 rootvol ENABLED 12288402 - ACTIVE - -
pl swapvol-01 swapvol ENABLED 4097331 - ACTIVE - -
pl swapvol-02 swapvol ENABLED 4097331 - ACTIVE - -


bash-3.00# vxprint -v
Disk group: rootdg

TY NAME ASSOC KSTATE LENGTH PLOFFS STATE TUTIL0 PUTIL0
v rootvol root ENABLED 12288402 - ACTIVE - -
v swapvol swap ENABLED 4097331 - ACTIVE -


Note:
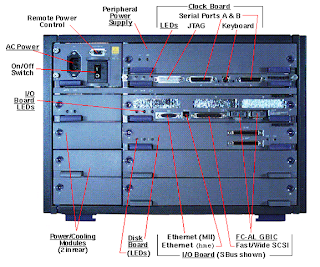
The image published here in this page - Sun E4500

Saturday, April 17, 2010

Solaris: Virtualization


Virtualization:

Virtualization means to create a virtual, or abstract, version of a physical devices or resource, such as a server, storage device, network or even operating systems, where the frame work divides the resource into one or more execution environments.


Zones:
1. A zone is a virtual environment that is created within a single running
instance of the Solaris Operating System.
2. Applications can run in an isolated and secure environment.
3. Even a privileged user in a zone cannot monitor or access process running in
a different environment.
4. Zone is a sub set of containers.
5. Runs on SPARC and X86 machines.


Containers:

1. Containers = Zones + Solaris Resource Management (SRM)

2. Container is a technology that comprises the resource management features,
such as resource pools and Solaris zones.

3. Remember Solaris containers use the same kernel.


Resource Management:
1. Is one of the integral components of Solaris 10 containers technology.
2. It allows us to do the following:
i. Allocate specific computer resources, such as CPU time & memory.
ii. Monitor how resource allocations are being used, and adjust the allocations when required.
iii. Generates more detailed accounting information.
iv. A new resource capping daemon (rcapd), regulate how much physical memory is used by a project. [Remember, a project can be a number of processes/users.]
v. Using resource management feature, multiple workloads can now be run on a single server, providing an isolated environment for each, so that one workload cannot affect the performance of the other.
vi. Resource Management feature of Solaris containers is extremely useful when a necessity of consolidating a number of applications to run on a single server.


Consolidation:
1. Reduces cost, complexity of having to manage numerous separate systems.
2. Consolidate applications onto fewer, larger, more scalable servers, and also
segregate the workload to restrict the resources that each can use.


LDOM:
1. Logical DOMain, technology allows to allocate a system’s various resources,
such as memory, CPUs & devices, into logical groupings and create multiple,
discrete system, each with their own operating system, resources, and
identify within a single computer systems.
2. Can be achieved by introducing a firmware layer.
3. Runs on SPARC based servers which supports hypervisor technology.


Additional:

Hypervisor:
1. Hypervisor is the layer between the operating system and the hardware.
2. Also called VMM (Virtual Machine Monitor), allows multiple operating systems
to run concurrently on a host computer.
3. Provides the guest operating systems with a virtual platform and monitors
the execution of the guest operating system.
4. The virtual machine approach using a hypervisor isolates failures in one
operating system from other operating systems sharing hardware.


Special Thanks to : Mr. T. Gurubalan, Sun Microsystems, My mentor for providing necessary information to blog this post.

Tuesday, April 6, 2010

Solaris: ZFS Administration: Disk Administration – Trouble Shooting


Solaris: ZFS Administration – Trouble Shooting


Once a disk is taken control by ZFS, then there is a possibility in the change of the disk layout.

For instance, earlier the disk c2t9d0 was under the control of ZFS.
Now once after removing the disk from ZFS control and trying to create a new slice (default – ufs), we face the following error.


OUTPUT TRUNCATED…
AVAILABLE DISK SELECTIONS:
0. c1t0d0 system
/pci@8,600000/SUNW,qlc@4/fp@0,0/ssd@w21000020371b6542,0
1. c1t1d0 system
/pci@8,600000/SUNW,qlc@4/fp@0,0/ssd@w21000020373e0ced,0
2. c2t3d0
/pci@8,700000/scsi@6,1/sd@3,0
3. c2t5d0
/pci@8,700000/scsi@6,1/sd@5,0
4. c2t9d0
/pci@8,700000/scsi@6,1/sd@9,0
5. c2t12d0
/pci@8,700000/scsi@6,1/sd@c,0
6. c2t15d0
/pci@8,700000/scsi@6,1/sd@f,0
Specify disk (enter its number): 4
Format> p
partition> p
Current partition table (original):
Total disk sectors available: 17672849 + 16384 (reserved sectors)

Part Tag Flag First Sector Size Last Sector
0 usr wm 256 8.43GB 17672849
1 unassigned wm 0 0 0
2 unassigned wm 0 0 0
3 unassigned wm 0 0 0
4 unassigned wm 0 0 0
5 unassigned wm 0 0 0
6 unassigned wm 0 0 0
8 reserved wm 17672850 8.00MB 17689233

partition>q
format>q


In that case, we can use the following command with the option –e
-e = Enables SCSI expert menu.

For eg: # format –e c2t9d0


OUTPUT:

bash-3.00# format -e c2t9d0
selecting c2t9d0
[disk formatted]


FORMAT MENU:
disk - select a disk
type - select (define) a disk type
partition - select (define) a partition table
current - describe the current disk
format - format and analyze the disk
repair - repair a defective sector
label - write label to the disk
analyze - surface analysis
defect - defect list management
backup - search for backup labels
verify - read and display labels
inquiry - show vendor, product and revision
scsi - independent SCSI mode selects
cache - enable, disable or query SCSI disk cache
volname - set 8-character volume name
! - execute , then return
quit
format>p
partition> modify
Select partitioning base:
0. Current partition table (original)
1. All Free Hog
Choose base (enter number) [0]? 1

Part Tag Flag First Sector Size Last Sector
0 usr wm 0 0 0
1 unassigned wm 0 0 0
2 unassigned wm 0 0 0
3 unassigned wm 0 0 0
4 unassigned wm 0 0 0
5 unassigned wm 0 0 0
6 unassigned wm 0 0 0
7 unassigned wm 0 0 0
8 reserved wm 0 0 0

Do you wish to continue creating a new partition
table based on above table[yes]?
Free Hog partition[6]?
Enter size of partition 0 [0b, 33e, 0mb, 0gb, 0tb]:
Enter size of partition 1 [0b, 33e, 0mb, 0gb, 0tb]:
Enter size of partition 2 [0b, 33e, 0mb, 0gb, 0tb]:
Enter size of partition 3 [0b, 33e, 0mb, 0gb, 0tb]:
Enter size of partition 4 [0b, 33e, 0mb, 0gb, 0tb]:
Enter size of partition 5 [0b, 33e, 0mb, 0gb, 0tb]:
Enter size of partition 7 [0b, 33e, 0mb, 0gb, 0tb]:
Part Tag Flag First Sector Size Last Sector
0 unassigned wm 0 0 0
1 unassigned wm 0 0 0
2 unassigned wm 0 0 0
3 unassigned wm 0 0 0
4 unassigned wm 0 0 0
5 unassigned wm 0 0 0
6 usr wm 34 8.43GB 17672848
7 unassigned wm 0 0 0
8 reserved wm 17672849 8.00MB 17689232


Ready to label disk, continue? y

partition> l
[0] SMI Label
[1] EFI Label
Specify Label type[1]: 0
Warning: This disk has an EFI label. Changing to SMI label will erase all
current partitions.
Continue? y
Auto configuration via format.dat[no]?
Auto configuration via generic SCSI-2[no]?
partition> p
Current partition table (default):
Total disk cylinders available: 4924 + 2 (reserved cylinders)

Part Tag Flag Cylinders Size Blocks
0 root wm 0 - 73 129.75MB (74/0/0) 265734
1 swap wu 74 - 147 129.75MB (74/0/0) 265734
2 backup wu 0 - 4923 8.43GB (4924/0/0) 17682084
3 unassigned wm 0 0 (0/0/0) 0
4 unassigned wm 0 0 (0/0/0) 0
5 unassigned wm 0 0 (0/0/0) 0
6 usr wm 148 - 4923 8.18GB (4776/0/0) 17150616
7 unassigned wm 0 0 (0/0/0) 0

partition>q
format>q


Note:

EFI - Extensible Firmware Interface (EFI), this is the default layout used by ZFS.